Let's talk about stays, baby

 |
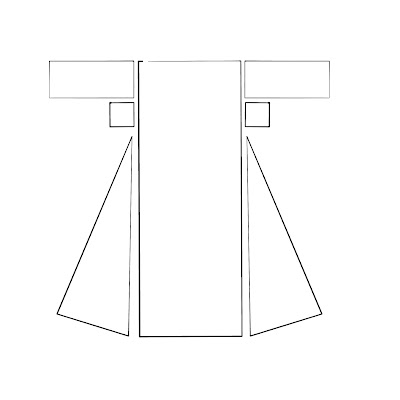
| Source: The Merry Corsetier |
Just look at the sheer DRAMA of that seam curve from the armscye to the center front point. How could I possibly resist?!
Contrary to popular belief – for which we can thank Victorian men – heavily structured foundation garments are not bad! Bodies, stays, corsets, have all played unique and highly practical roles throughout history. Not only do they help the wearer achieve a fashionable silhouette from late Elizabethan cone torsos to the elegant Edwardian S-bend, they also support the back and redistribute the weight of skirts.
 |
| It's a lot of skirt. Source: National Portrait Gallery, London |
But... they're also a lot of work. Historically, staymaking was the purview of highly trained professionals, largely men (because all that heavy-duty sewing was just too much for poor delicate female fingers), and after three solid months of hand stitching BOY DO I UNDERSTAND WHY. There are roughly three stages of staymaking, according to me, a wee costuming baby:
- Preparation
- Construction
- Finishing
The preparation stage is probably the most involved. Before you can even look at your fabric, you have to figure out a pattern and resolve any major fitting issues, which can be pretty significant and may involve an avalanche of mockups. I got insanely lucky with those first steps. I purchased a pattern from an Actual Expert with a reputation for being thorough, easy to understand, and responsive to questions – all of which is true! Please support Leimomi and Scroop Patterns! – and the fit of my first mockup was almost perfect. The only alteration I needed was so simple that it didn't require multiple tests.

After working out a functional pattern, there's tracing, cutting, pinning, basting, and generally making sure that all your pieces of fabric are in the right shape and will stay where you want them while the next part of preparation happens. The average pair of stays will have 3 layers. On the outside is the "pretty" fabric, and 2 layers of heavier stabilizing material (interlining) sit underneath. I used linen canvas for my interlining because it's strong and made in a plain weave that prevents it from stretching or shifting. The exterior is wool leftover from another project. It's important to use sturdy materials for a garment like this, because it'll take a lot of strain when molding the body into the right shape. Although my wool outer fabric is a more elastic twill weave – not plain weave like the linen – and wouldn't work well on its own for this purpose, the combination of fabrics will keep the whole piece stable.

Then comes the ultimate stabilizer: boning. A lot of it. And therefore... a lot of boning channels. I counted 64 in this particular pattern, all of which I hand stitched because I'm a crazy person and fully aware of that fact. All of those channels have to be sewn through all three layers of fabric before any pieces get connected. This is the part that ate up two months of my life. I can't even tell you how many shows I binge-watched while sewing endless rows of backstitch, but hey, at least now I've seen Outlander I guess.
 |
| "What'd you do during quarantine?" "Uh..." |
With all channels complete, the boning can be inserted, which sounds like a great break from the previous tedium until you realize that it's just meticulously measuring, cutting, and sanding 64 lengths of curved plastic while your cat tries to eat all of it. (My final product has a lot of hidden tooth-holes.) In the actual 18th century, of course, my plastic would have been whalebone or reed. Whalebone isn't exactly available these days thanks Obama, and although there are some viable sources of reed, it's a notoriously brittle material requiring far more patience than I can spare for an already trying project.
 |
| My godmother is hilarious and I will fight anyone who disagrees. |
But hey! It's time for the fun part, which is an incredibly subjective phrase, but how can you not enjoy watching a bunch of flat fabric turn into a recognizable garment? Let's get into construction.
Of course, construction is also a bunch of meticulous hand stitching. And this time instead of nice neat straight lines, it's wrestling very thick and rigid panels into curved seams that have to match up despite being different lengths. Those beautiful dramatic lines reeled me right in. I had to use binder clips to hold it all together, and trust me, maneuvering a bunch of fully-boned, oddly-shaped, increasingly-unwieldy pieces loses its novelty pretty fast. I can't even describe the experience adequately because I think I blacked out in a haze of stubbornness.
 |
| Difficult difficult lemon difficult. |
Like the boning channels, the construction seams are all done in heavily waxed linen thread. Because these seams will take so much strain, however – remember that whole "making your body a different shape" thing? – the thread has to be doubled up and the stitches are incredibly dense. My pattern instructions recommended 18-25 stitches per inch, all of which must be made through TWELVE LAYERS of fabric. I switched from my beloved leather thimble to a brass one because the needle kept punching through the leather. It's a small miracle that I didn't have to break out a pair of pliers, and the needle still ended up with a distinct curve.
Finishing the construction stage is seeing a light at the end of a tunnel (or a boning channel). Finally, all that fabric and plastic and thread looks like stays, and surely the rest is easy.
Well, it's easier than the first two parts.
The main components of finishing are eyelets and binding. Eyelets are simple; mark placement, use awl, stitch, done. They're just tedious when you have a lot of them and frustrating when your lovely bouncy wool twill wants to close up as soon as you take the awl away. I spared myself some misery by skipping the partial front lacing that my pattern called for.
Binding the edges was an ordeal. The gentle curves across the top were no trouble, but the bottom... I'll just let Ms. Morgan Donner illustrate that particular struggle.
At long last, though, I got there. Wearable stays. Stays that look halfway decent, even.
 |
| High bust? Cone waist? I'm practically fighting off Founding Fathers here. |

 |
| Just LOOK at the LINES |
 |
| It's illegal to pose in 18th century clothes without being dramatic. Also, I'm a trained ballerina and this is basically a tutu bodice. |
I absolutely love them. They took a hell of a lot of work, and I'm incredibly proud of myself for tackling this project at all when it was so intimidating. Sure, I spent the whole time cursing and vowing to never again make a boned garment, but I couldn't have gotten this experience or knowledge in any other way. Totally worth it.
(With that said, the next pair is going directly under the machine. Because we all know I can't stop at one.)

Comments
Post a Comment